Thursday, April 7, 2011

Understanding Facebook Privacy

For your own safety and protection you should always review the privacy settings of any application or website you join on the web. Facebook privacy is rather complex and its policies have often been controversial in regards to how much user information is being shared. That is why it is important to have a good understanding of how your information is shared and what policies and controls Facebook has in place for privacy.
Reviewi this lesson carefully in order to get a better idea of how to set your privacy controls to a level you are comfortable with.

You've heard the stories surrounding Facebook privacy issues. They range from someone being slightly humiliated by a photo that was shared to an employee being fired for making negative comments about their boss. Facebook has several levels of privacy that could prevent such situations, but unfortunately many users do not pay attention to their privacy settings and that can lead to trouble.
Below are five essentials that everyone should understand about Facebook privacy:
Facebook automatically defaults privacy settings to Everyone. In other words, if you do not set your privacy settings, then your information will be available to anyone and everyone both within Facebook and outside on the web for anyone to search, access and use.
Some public information from your profile is always considered publicly available and is excluded from privacy settings. This information includes your name, profile picture, gender and networks you belong to. You do however have the option of not including photos, gender and networks in your Profile.
When you connect with third-party websites and applications they can access and use information on Facebook related to you and your Friends. In other words. when you respond to a survey or join a game, you are giving these sites access to your account and all the personal information about you and your Friends. You should pay special attention to the privacy settings for Applications and Websites if you plan on connecting with third-party sites.
Facebook allows advertisers to serve advertising to you based on characteristics obtained from your personal information. Facebook does not share your information or who you specifically are without your consent. However, if you click on an advertisement, that advertiser may put a cookie in your browser for tracking purposes.
Privacy settings for minors are not allowed to be set to Everyone or Public Search. Profiles for those under the age of 18 are limited to Friends of Friends and Networks and are not listed in the public search option. However, their public profile information including name, profile picture, gender and networks are still available.

When you sign up with Facebook, your privacy settings are defaulted to Everyone. Everyone includes everyone on Facebook and anyone on the Internet that conducts a search for your name. If you want to protect your personal information and your activity on Facebook then it is a good idea to customize your privacy settings.
Watch the video to see an example of how you might want to set your privacy, then review the interactive below for specific definitions of the privacy settings offered by Facebook.

Account Settings Facebook

Before you can create a Profile you first have to establish an account, which is free. Once you have an account the next step is to start configuring your account settings. Knowing where you can change these settings may make you feel a little more comfortable.

You may have content that you don’t mind your Friends seeing but you don’t necessarily want all of their Friends to have access to. In Facebook you can decide who gets to see what. There are seven tabs on the Account Settings page. Each one of them allows you to control specific account details.

To Change Your Account Settings

  1. Locate Account on the Dashboard Toolbar. From the Account menu, select Account Settings.
Account Menu Account Menu

Exploring the Settings Tab

  • The Settings tab lets you change your basic account information.
  • Below is a snapshot of the Settings tab.
Settings tab Setting Tab
  1. Name: This is the name you entered when you signed up for your account. You have the option to change this at anytime. When you enter your name change, you have to select a box stating that this is a legitimate request. If your request is not legitimate the system will reject your name change immediately.
  2. Contact Email: This email address is where you will receive notifications. These notifications can be turned off at anytime if you choose not to receive emails from Facebook.
  3. Password: You can change your password at anytime.
  4. Security Question: If you lose or forget your password, Facebook will ask you a security question so that you can retrieve your password.
  5. Privacy: You can choose to manage your Privacy options from here or from the Settings menu.
  6. Credit Cards: Facebook is free but there are fees associated with purchasing Ads and some gifts.
  7. Deactivate Account: This is where you come to deactivate your account. See Lesson 16 to learn more about deactivating your account.
Networks represent the places that you feel most connected to. The Network that you join also drives your search results. For instance, if you join a North Carolina network, when you search a person's name or local events, North Carolina results will appear first. You can change your Network settings at any time.
There are four main areas under the Networks tab, as detailed in the image below. The results in this example represent a regional network. There are other types of Networks you can join but we'll get to that later!
My Account Networks Tab
Tell me more about the snapshot.
  1. Your Networks: This box tells you which Network you belong to, how many of your Friends are in this Network, and how many total Facebook members belong to it.
  2. Change Your Region: Click the Change Region link to select a new region to join (city or town).
  3. Leave a Network: Don't want to be a part of this Network anymore? You are free to leave but you will also be kicked out of the groups and events you joined in this Network. Don't worry, once you click this link Facebook asks you one more time if you are sure you want to leave.
  4. Join Other Networks: Don't be shy, join more than one Network! You can join other city, workplace, school, or regional networks. Just type what you're looking for in the Network name: search field and start looking!

Exploring the Notifications Tab

The features under this tab could very well be your best friend. Facebook notifies you by email each time an action takes place on Facebook that involves you. You might want to be informed every time someone comments on your photos or requests to be your Friend. Or, maybe you don't want to know each time your Friend's Friend makes a comment! You can tell Facebook which notifications you do or don't want sent to your email.
Notifications Tab
Tell me more about the snapshot.
  1. Email: This is the email address where your notifications are sent. You can change this through Account Settings.
  2. Applications and Features: This is a list of Applications and Features associated with your account.
  3. Options: From here you can decide if you want notifications sent to your email address every time an action takes place that involves the Application or Feature on the left.
  4. Shortcut Menu: The Notifications list is long. If you want to go straight to a section just click one of these Applications or Features to apply changes. 

Exploring the Mobile Tab

If you like to get your messages or send updates to your Profile while on the go, Facebook Mobile is the perfect feature for you! The Mobile feature works on all phones with mobile web access.

With Facebook Mobile you can:

  • Update your Status
  • View Friends' Profiles
  • Browse your News Feed
  • Message Friends using text messages
  • Upload mobile photos
Mobile Tab (Top) Mobile Tab (Top)
Mobile Tab (Bottom) Mobile Tab (Bottom)
Tell me more about the snapshots.
  1. Phone Number Field: Enter your mobile Phone Number and include a plus sign (+) along with your country code. If you are not sure what your country code is, look in the Carrier: menu in number (#2).
  2. Carrier Menu: Click on the dropdown arrow to find your mobile phone Carrier on the menu.
  3. Activate Button: Click the >strong>Activate button. A text message with the confirmation code will be sent to your phone.”
  4. Confirmation Page: This is what you will see after you click the Activate button. Enter this code in the Confirmation Code: box.

Exploring the Language tab

Over 70% of Facebook members are from outside of the USA. The Language option allows you to set your primary language of choice. Search results will also include results in this language.

Language Tab Language Tab
  • Click the dropdown arrow to select your primary language from the menu. 

My Account My Account
  • Select the Payments tab in My Accounts to adjust settings for buying credits and making payments for Facebook purchases.
  • Select the Facebook Ads tab to adjust privacy settings for Facebook Ads and third-party applications ads.
  • Not only can you join a network, you can also create your own.
  • You can use the Notifications tab to monitor all activities on your Facebook account.
  • Facebook Mobile is convenient but there have been cases of spam text messages being sent out to people who register for this service.


Create an Account Facebook

It's time to create your Facebook Account so you can connect with your family, friends, co-workers, and more! It's easy to sign up and remember, it's FREE!

this lesson you'll learn how to create an account but be forewarned - Facebook can be very addictive! All jokes aside, it's a great tool for networking and keeping in touch with people. Let's get started! 

To Sign Up for an Account

  1. Go to www.Facebook.com
  2. Enter your name, email address, gender, date of birth, create a password, and click the Sign Up button.
  3. Sign Up Sign Up Page
  4. Once you click Sign Up you will have to enter the information from box 1 into box 2 for a security check. Doing this just proves to Facebook that you are indeed a human and not some machine trying to create fake accounts. Click the Sign Up button.
  5. Security Check Security Check
  6. You will need to confirm your email address before moving on. This just confirms that you signed up for this account and not someone else. Click Go to [name of your email provider] to confirm. This will take you to your email account.
  7. Confirm Email Confirm Email
  8. You'll receive an email from Facebook with directions on how to confirm your email address. Once you've confirmed your email address, your account is valid. Congratulations! Just enter your password to get started!
  9. Create Password 
    Create Password
    • You can create several different accounts using separate email accounts. You may want to do this if you want to have a personal profile and a professional profile.
    • You can only use an email account once to create a Facebook account. Multiple profiles can not be attached to one account.
    • It's a good idea to set your Privacy Settings (see Lesson 3) before you start adding Friends and joining Networks.
    from: http://www.gcflearnfree.org
       

    Sunday, August 15, 2010

    memfilter email notification Facebook

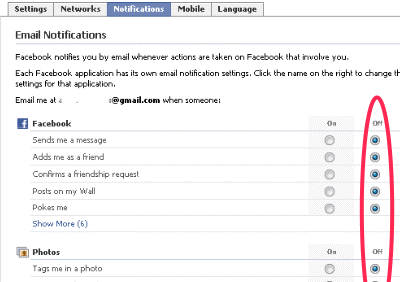
    Membuka facebook adalah kegiatan sehari-hari saya sambil melihat update terbaru teman serta notification (pemberitahuan) terbaru dari facebook. Tidak lupa membuka email mengecek mungkin ada email baru yang penting, tapi coba tebak apa yang saya dapat?

    Email-email notification dari facebook yang menurut saya tidak penting, toh saya buka facebook terus dan tidak merasa perlu facebook mengirim notification ke email saya. Terganggu dengan email facebook yang banyak tersebut , saya putuskan untuk menyaring email notification apa saja yang penting untuk dikirim ke email atau sama sekali tidak perlu mendapatkan email dari facebook.

    Berikut cara memfilter email notification yang masuk ke email kita

    -Pilih Settings > Account settings > Notifications ( Pengaturan > Pengaturan Akun > Pemberitahuan )

    -Silakan pilih notification apa yang penting untuk diirim ke emai, atau matikan semua agar tidak mendapat email dari facebookemail facebook


    save changes (simpan) dan selesai, email facebook yang tidak penting itu tidak akan menggangu inbox Anda.

    Sejarah Facebook


    Tentang Facebook adalah
    Facebook adalah website jaringan sosial dimana para pengguna dapat bergabung dalam komunitas seperti kota, kerja, sekolah, dan daerah untuk melakukan koneksi dan berinteraksi dengan orang lain. Orang juga dapat menambahkan teman-teman mereka, mengirim pesan, dan memperbarui profil pribadi agar orang lain dapat melihat tentang dirinya.

    Facebook didirikan oleh Mark Zuckerberg, seorang lulusan Harvard dan mantan murid Ardsley High School diluncurankan pertama kali pada 4 februari dan awalnya hanya untuk siswa Harvard College. Dalam dua bulan selanjutnya, keanggotaannya diperluas ke sekolah lain di wilayah Boston (Boston College, Boston University, MIT, Tufts), Rochester, Stanford, NYU, Northwestern, dan semua sekolah yang termasuk dalam Ivy League.

    Banyak perguruan tinggi lain yang selanjutnya ditambahkan berturut-turut dalam kurun waktu satu tahun setelah peluncurannya. Akhirnya, orang-orang yang memiliki alamat email universitas (seperti .edu, .ac.uk, dll) dari seluruh dunia dapat juga bergabung dengan situs ini.

    Selanjutnya Facebook dikembangkan pula jaringan untuk sekolah-sekolah tingkat atas dan beberapa perusahaan besar. Sejak 11 September 2006, orang dengan dengan alamat email apa pun dapat mendaftar di Facebook. Pengguna dapat memilih untuk bergabung dengan satu atau lebih jaringan yang tersedia, seperti berdasarkan sekolah tingkat atas, tempat kerja, atau wilayah geografis.

    Facebook menemui masalah dalam beberapa tahun terakhir seperti pemblokiran pada negara Suriah, Iran dan beberapa tempat kerja agar para pekerja tidak menyalahgunakan waktu kerjanya untuk membuka Facebook. Dan masalah tentang tuduhan bahwa Zuckerber mencuri kode program dari teman-temanya untuk membuat Facebook.

    Facebook juga pernah ditawar oleh yahoo senilai $ 1 miliar dan kemudian oleh seorang anggota dewan Facebook, menunjukkan bahwa Facebook internal valuation adalah sekitar $ 8 miliar berdasarkan proyeksi pendapatan sebesar $ 1 miliar pada tahun 2015.

    Peringkat Facebook saat saya tulis artikel ini menempati urutan ke 6 situs yang paling banyak di akses di indonesia dan urutan ke 5 untuk seluruh dunia.


    Photobucket
    *Kantor Facebook

    Berikut data mengenai facebook:

    Founded : Cambridge, Massachusetts(February 4, 2004)

    Headquarters : Palo Alto, CaliforniaDublin, Ireland (international headquarters for Europe, Africa, Middle East)

    Key people : Mark Zuckerberg (Founder and CEO), Dustin Moskovitz (Co-founder), Sheryl Sandberg (COO), Matt Cohler (VP of Product Management), ChrisHughes (Co-founder)

    Revenue : 300 million USD (2008 est.)

    Net income : 47.4 million USD (2007 est.)

    Employees : 700 (November 2008)

    Website : facebook.com

    Type of site : Social network service

    Advertising : Banner ads, Referral marketing

    Registration : Required

    Available in : Bulgarian, Catalan, Chinese (simplified), Chinese (Hong Kong), Chinese (Taiwan), Croatian, Czech, Danish, Dutch, English (American),English (British), English (Pirate), Filipino, Finnish, French, German, Greek, Hungarian, Indonesian, Irish, Italian, Japanese, Korean, Malay, Norwegian, (bokmål), Polish, Portuguese (Brazilian), Portuguese (European), Romanian, Russian, Serbian, Slovene, Spanish (Castilian), Swedish, Thai, Turkish,Vietnamese, Welsh

    Launched : February 2004

    Merubah Tampilan Di Facebook

    Facebook memiliki beberapa unggulan dibandingkan Friendster dkk, namun kelemahan paling fatal adalah tidak tersedianya fitur untuk merubah tampilan dan mengganti theme pada Facebook. Padahal kustomisasi theme sangatlah perlu agar bisa memiliki tampilan Facebook yang berbeda lain daripada yang lain.
    Ada beberapa cara mudah merubah tampilan pada Facebook.
    -Merubah tampilan layout Facebook dengan userstyles.org (untuk pemakai browser Mozilla Firefox)
    1. download add-ons mozilla klik disini
    2. klik add to firefox, instal lalu jika proses instalasi selesai restart mozilla firefox Anda
    3. pilih tampilan Facebook yang diinginkan klik disini
    4. klik tombol Load into Stylish
    5. save dan refresh halaman Facebook Anda (CTRL + R)
    -Merubah tampilan layout Facebook dengan yontoo.com (untuk pemakai browser Mozilla Firefox & Internet Explorer)
    1. kunjungi website yontoo klik disini
    2. pilih Start Installation
    3. install add-ons dan restart browser Anda
    4. pasang aplikasi Page Rage di Facebook klik disini
    5. pilih tampilan Facebook yang Anda inginkan
    6. lalu refresh dan lihat tampilan baru Facebook Anda
    -Merubah tampilan layout Facebook dengan menggunakan Facebook Code
    dengan menggunakan Facebook code, selain merubah warna tampilan pada Facebook, Anda juga bisa menghilangkan iklan bahkan Anda bisa juga merubah theme Facebook.
    Facebook Code adalah suatu script yang bisa Anda jalankan di komputer dengan tujuan agar Anda bisa lebih leluasa dalam mengakses Facebook sesuai dengan keinginan. Sebelum menjalankan dan menginstal Facebook Code terlebih dahulu pastikan bahwa di komputer terinstal Add-On GreaseMonkey untuk browser Anda. Bila Anda mempergunakan Firefox maka Anda harus menginstal dulu GreaseMonkey khusus untuk Firefox (klik disini), dan bila Anda mempergunakan Internet Explorer atau IE anda bisa mendapatkan GreaseMonkey untuk IE (klik disini).
    Dengan Add-on GreaseMonkey anda bisa menginstal berbagai macam Facebook Code, yang akan merubah Tampilan Facebook di komputer anda menjadi lebih cantik dan tentunya lebih sesuai dengan keinginan. Setelah GreaseMonkey terinstal di komputer anda, pastikan anda bisa melihat icon GreaseMonkey di pojok kanan bawah browser yang anda pakai.
    Note: Cara-cara merubah tampilan pada Facebook ini hanya merubah tampilan maupun theme Facebook di komputer Anda saja. Untuk mengembalikan tampilan Facebook seperti semula tinggal disable saja